5.3.2. Labels & Actions Area
Labels & Actions Area
Field and Table Labels
####### Unlabeled Field Labels
Display the Field Name, a double dash "--" for the Field Value, the Annotate button (a square with a plus sign in the bottom right corner), and the Add Instance button (the left and bottom sides of a square on the lower right side of a square with a plus sign in the middle).
![]()
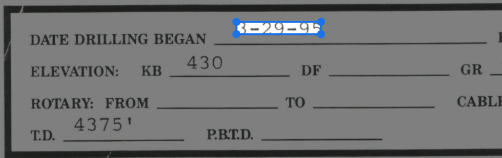
####### Suggested Field Labels
The Suggested Field Labels are highlighted in purple and display a dark purple square containing two 4-pointed stars below the Field Name. Following the Field Name is the Field Value which for Field with Data Type Checkbox will display either a checked checkbox (a blue square with a checkmark) or an empty checkbox (a grey sided square); for other Data Type Fields the Field Value will show the predicted text. If the predicted text was also normalized the Normalized Field Value is displayed below the Field Value next to the Google G. The Action buttons of Suggested Field Labels are the Confirm button (a circle with a checkmark inside), the Edit button (a pencil symbol), the Add Instance button (the left and bottom sides of a square on the lower right side of a square with a plus sign in the middle), and the Delete Button (a trash can symbol).
![]()


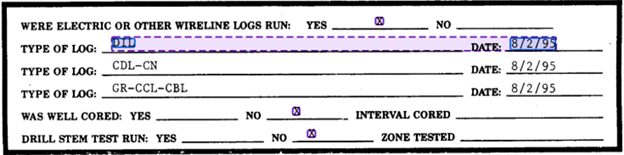
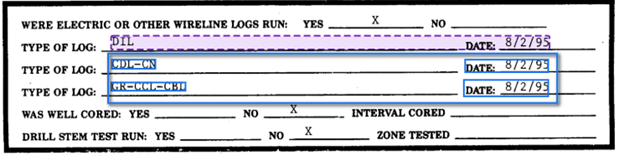
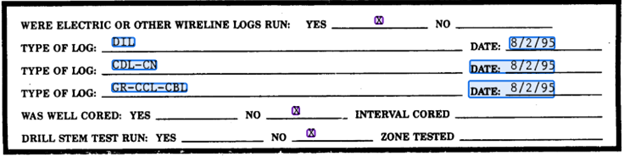
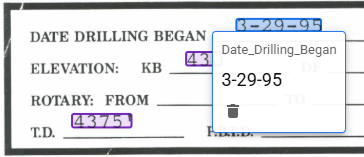
####### Confirmed/User Defined Field Labels
The Field Labels that were Suggested Field Labels that have been confirmed will display an outline of a person with a checkmark below the Field Name otherwise the Field Label was User Defined. Following the Field Name is the Field Value which for Field with Data Type Checkbox will display either a checked checkbox (a blue square with a checkmark) or an empty checkbox (a grey sided square); for other Data Type Fields the Field Value will show the predicted text. If the predicted text was also normalized the Normalized Field Value is displayed below the Field Value next to the Google G. The Action buttons of Field Labels are the Edit button (a pencil symbol), the Add Instance button (the left and bottom sides of a square on the lower right side of a square with a plus sign in the middle), and the Delete button (a trash can symbol).

![]()
![]()

####### Table Labels without Labeled Child Field Labels
Display the Table Name, a double dash "--" for the Field Value, and the Add Instance button (the left and bottom sides of a square on the lower right side of a square with a plus sign in the middle). Followed below by the indented "Child" Field Labels.

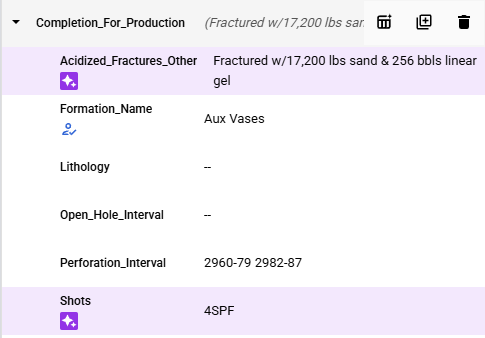
####### Table Labels with Suggested/Confirmed/User Defined Child Field Labels
Display the Table Name, a tuple of the "Child" Field Label Field Values, the Add More Rows button (the symbol of a data table with a 4-pointed star in the top right corner), the Add Instance button (the left and bottom sides of a square on the lower right side of a square with a plus sign in the middle), and the Delete button (a trash can symbol). Followed below by the indented "Child" Field Labels.
Action Buttons
####### Add Instance
The Add Instance button is used to add an additional instance of the specified Label. The new instance will appear below the current Label.


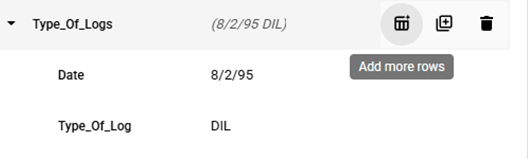
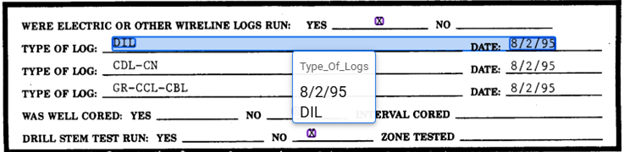
####### Add More Rows
The Add More Rows button is used to quickly label the remaining rows of a table based on the position of the labeled "Child" Field Labels in the Table Label. When Add More Rows is in use the Table Label boundary will switch from blue to a dashed purple, and within the Labeling Bounding Box the identified new "Child" Field Labels will be included within their own Bounding Boxes, Table Label Bounding Boxes will not be shown during the Labeling step. Any number of additional rows can be added at a time and the new Table Labels will be added as collapsed Table Labels below the initial Table Label. Table Labels and "Child" Field Labels added with this tool should be immediately verified because mixing rows, column and/or including extra words regularly occurs.

######## Expanded

####### Annotate
The Annotate button selects the Unlabeled Field Label so that the next drawn Bounding Box or Selected Text will be associated with the Field Label.
![]()
![]()

####### Confirm
The Confirm button is only present for Suggested Labels and is used to confirm the Bounding Box position of the Suggested Label and converts it to a Confirmed Label.
######## Suggested Label

######## Confirmed Label

####### Delete
The Delete button is used to either remove additional instances of a Label or reset the last instance of a Label to the Unlabeled status.


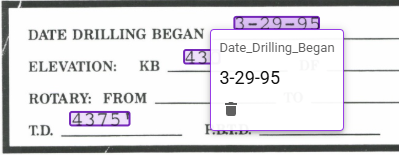
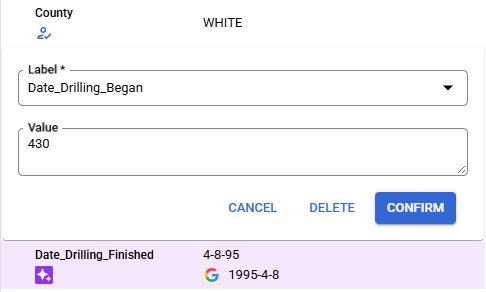
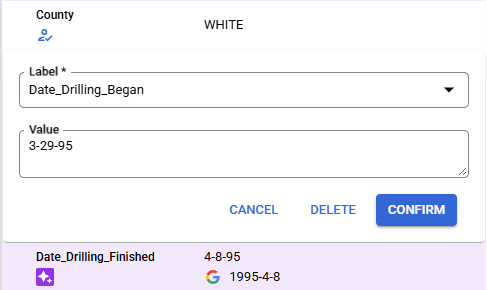
####### Edit
The Edit button opens the Field Editing Interface which allows the user to change the Field of the Label, change the Value, and Move or Resize the Bound Box. Note: MANUALLY EDITING VALUE WILL NEGATIVELY IMPACT MODEL TRAINING! Remember the Value must match the Extracted Value.


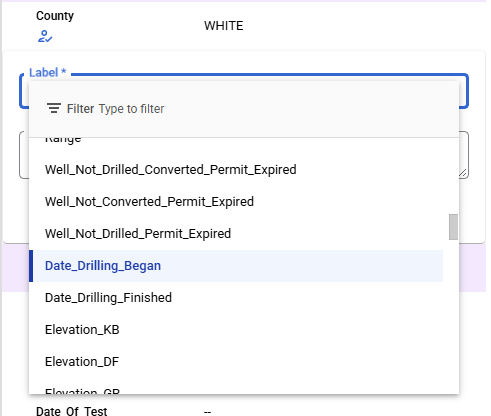
######## Change Field of Label
To change the Field of the Label, click on the "Label *" box to open a dropdown of available Schema Fields to select from, the change will not be reflected until the Confirm button is clicked.

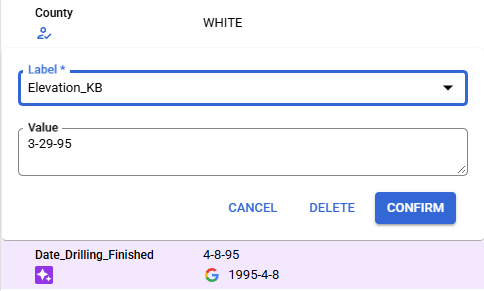
######## Change the Value of a Label
To change the Value of the Label click cancel to undo any changes, the Value must match the Extracted Value.

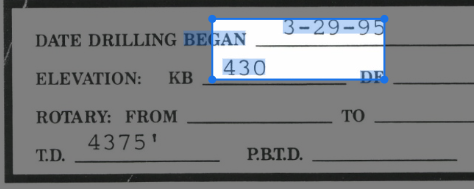
######## Move Bounding Box
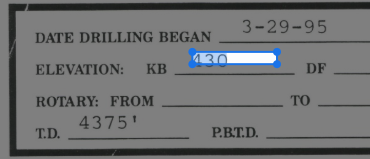
To Move the Bounding Box position, click, hold, and drag the interior of the Bounding Box to the desired position. Note: The Value is auto updated with the OCR Extracted Value since the Value must match the Extracted Value. When moving the Bounding Box any new Text that is overlapped by the Bounding Box will get highlighted in blue and will be included in auto updated Value.
######### Original Position


######### New Position
######## Resize Bounding Box
To Resize the Bounding Box position, click, hold, and drag one of the four corners of the Bounding Box to the desired position. Note: The Value is auto updated with the OCR Extracted Value since the Value must match the Extracted Value. When resizing the Bounding Box any new Text that is overlapped by the Bounding Box will get highlighted in blue and will be included in auto updated Value.
######### Original Position

######### New Position